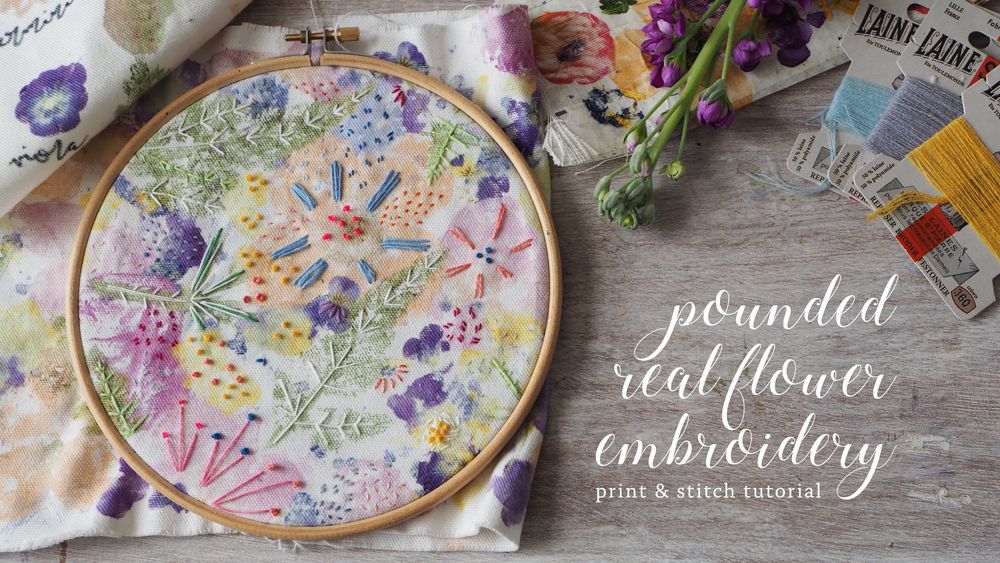
How To Make A Pounded Flower Embroidery

So in this tutorial, I’m going to show you how to make print and stitch a pounded flower embroidery, using real flowers, which you can then either sew with, frame or hang the embroidery hoop on the wall.
What you will need:
- Embroidery hoop
- Embroidery thread
- Embroidery needles
- Linen or linen/cotton mix fabric (white or off-white)
- Brightly coloured flowers*
- Green leaves and stems (like ferns and cow parsley)
- Sharp scissors or secateurs
- A solid wooden board
- Masking Tape
- Kitchen roll or absorbent paper
- A hammer or mallet
* I used violas, poppies, cow parsley, scented stocks, roses, peonies, centaurea montana, ceanothus, dandelions and some tall yellow flowers I found growing on the kerbside.
Step 1.
Place a wooden board on your table or floor. You’ll need to hammer hard, so unless your table is really solid, the floor might work best. Gather your flowers, petals and leaves. Flowers with bright pigmented petals work best.
Step 2.
Start with a test print first, to get to know how the flowers behave and which colours come through best. Cut off a scrap piece of your fabric, lay your flowers face down on the fabric, tape down and cover the leaves with masking tape. Snip off any stems that are sticking out. Turn the fabric over and lay on a piece of kitchen roll or absorbent paper placed on top of your wooden board.
Step 3.
Pound with a hammer! You’ll need to press hard but not so hard that you damage the fabric. Go round the edges to make sure you get all the petals in. The colour from the flowers and leaves will start to seep through the fabric, so you can see when it’s working.
Step 4.
When you think you’ve transferred as much pigment as you can, turn the fabric back over and carefully peel off the masking tape to reveal the print. There will probably be some flower remnants left on the fabric from the stamens or bits of pollen - dab these off with kitchen roll. Make a note of which print & colour comes from which plant. I used a fabric pen to mark down the names next to each print. This makes a useful guide next time you want to do a print.
Step 5.
Now for the real thing. Take your piece of fabric and begin laying out the flowers, petals and leaves to create your pattern. You could go very subtle and keep the flowers more spread out and subtle, or just choose greens or blues. I wanted a really bold and busy print, so I went all out. I started with leaves to give some structure, and then added my big flowers, followed by smaller violas and petals and finally sprinkled extra petals over the whole piece.
Step 6.
When you’re happy with how it looks, cover the flowers with masking tape. If you only have a few flowers you can just cover the individual petals and leaves like we did in Step 2. Or if you’ve gone all out like me, use strips to cover the entire width of the fabric. Turn the fabric over and lay out on sheets of kitchen roll. If you’re pounding a lot of flowers, you might want to do it on the floor as it’s quite hard work and can take some time.
Step 7.
Once the pigment is showing through across all your fabric, turn it over and peel back the masking tape to reveal the gorgeous floral prints. (I also love the pattern left behind on the masking tape, and have plans to turn it into a pattern repeat, get it digitally printed on fabric and hopefully make it into a dress or skirt.) Dab your fabric as before to remove any plant bits left behind.
Step 8.
Iron on a low heat to set the print.
Note: the prints might not all be colour fast, even after heat setting, so if you want to use your fabric for upholstery or anything that will be washed, try putting some test prints into the washing machine first and see how it fares.
Step 9.
Now for the embroidery part. Study your fabric and choose your favourite part. I chose a section with a large poppy and clear viola prints. Start adding stitches using the shapes and colours of your flowers as a guide. The aim here is to embellish the flowers and add in the details that the printing process took out. Think about starting with your main feature flower and work from there.
I used a combination of Back Stitch, Running Stitch, Seed Stitches and French Knots to create mine. I chose neon pink French Knots for the centre of my poppy to add a pop of bright colour, add the vibrancy of the flowers back in and give the embroidery a modern feel.
The embroidery is a joy so don’t feel you need to rush it. Stitching fronds on to ferns and watching the thread slide through fabric on French Knots is one of life’s pleasures – sit back with a cup of tea and enjoy the process. You can keep coming back to it over a few days if you want to, adding more stitches where you want them.
And that’s it. Once you’re happy with your embroidery, trim the fabric around the back and hang the hoop as it is, frame it as a piece of art or sew with it.
Follow us on Instagram for more ideas & beautiful photos of our flowers, or head over to our flower collections to place an order.